Tiranga Withdrawal
Tiranga withdrawal on the official Tiranga app is simple once you’re registered and logged in. From the bottom bar, open Account → Withdraw and choose one of three methods—Bank Card, USDT (TRC20), or AR Wallet. This step-by-step shows every screen, where to tap, the limits shown in the app, and what proof to keep.
Before You Withdraw: Register & Log In
Register on Tiranga Game
Registering on the Tiranga app is crucial—it’s how you unlock welcome bonuses and secure your wallet. Just install, tap Register, enter your phone/email, set a strong 8+ character password, and agree to the terms. For screenshots and extra tips, check our complete Tiranga registration guide.
Log in to the Tiranga app
For a smooth Tiranga Game login, open the app and choose Phone or Email—enter your credentials and (on a trusted device) enable Remember password. If you’re locked out, use Forgot password or the Self-Service/Customer Service option. For step-by-step screenshots and fixes, see our complete Tiranga login guide.
Tiranga Game Withdrawal — Quick Checklist
- Open the Tiranga app → Account tab → Withdraw.
- Pick a method: Bank Card, USDT, or AR Wallet.
- Enter the amount (respect the in-app range), review the rules, and submit.
- Track status in Withdrawal history and keep screenshots/order numbers.
Tip: Have your KYC & bank details ready. Always match network/amount exactly for crypto.
1. Go to Account → Withdraw (after login)
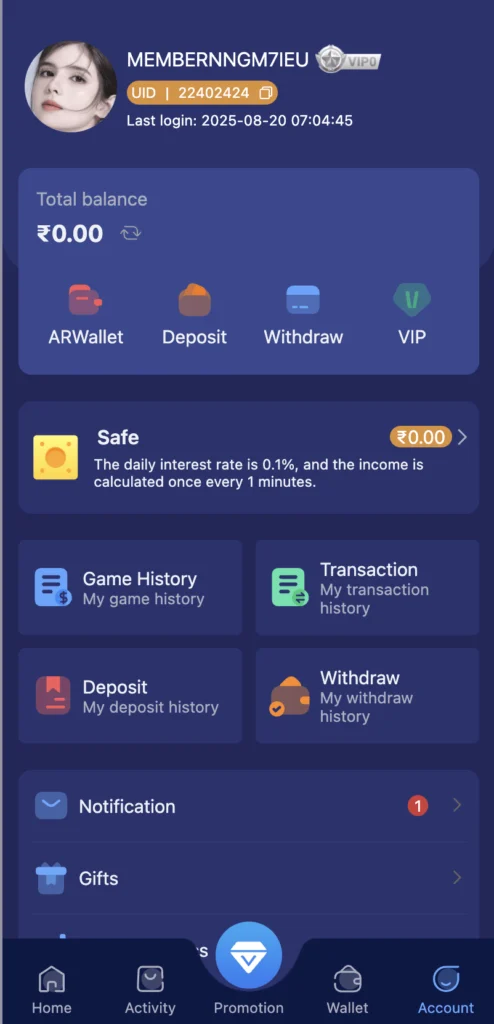
After your Tiranga Game login, look at the bottom bar and tap Account (right side).
This opens your profile hub with balance, Deposit and Withdraw options, histories, and more.
Tap Withdraw to start your payout and follow the on-screen steps.
2. Withdrawal Methods
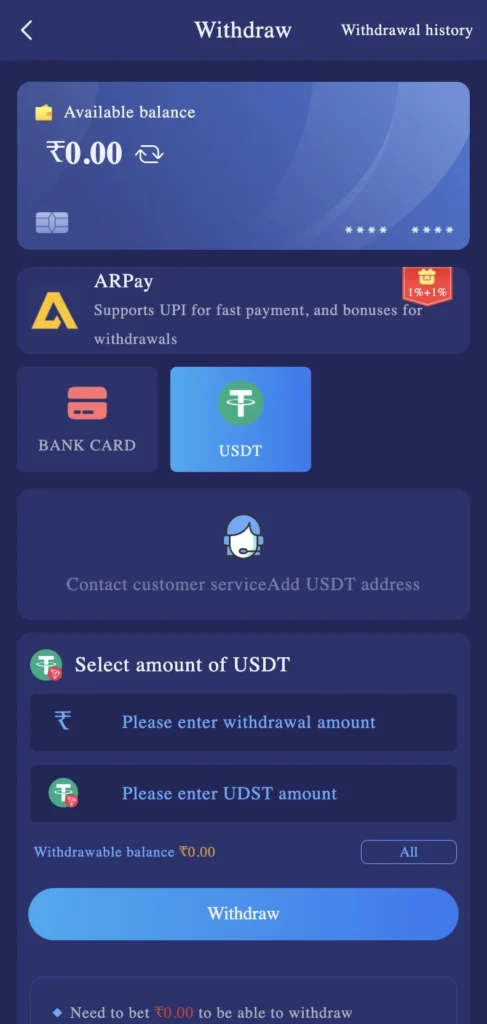
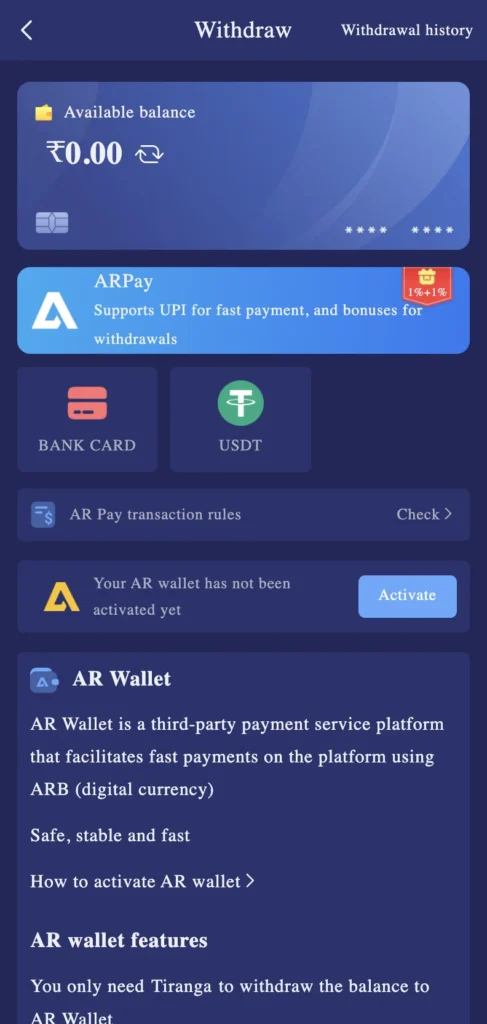
After your Tiranga Game login, go to Account → Withdraw in the Tiranga app. You’ll see three ways to cash out:
1) Bank Card (Direct to Bank)
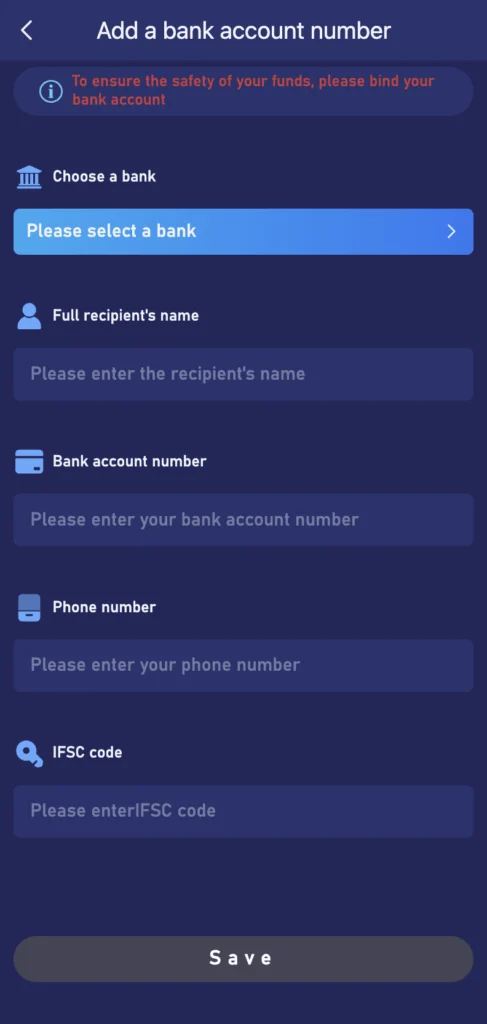
Add/confirm your beneficiary (Bank, Name, Account No., IFSC, Phone), enter the amount within the in-app limits, and submit. Use exact account details to avoid delays. Track status in Withdrawal history.
2) USDT (TRC20)
Enter the withdrawal amount, confirm your TRC20 address, and submit. The chain usually needs several confirmations before funds arrive. Double-check the network/address and keep the tx hash for support.
3) AR Wallet
If it’s your first time, tap Activate AR Wallet: verify mobile (OTP) and set a 4-digit payment password. Then withdraw via AR Wallet—some promos/bonuses may apply. Follow on-screen steps and review the AR Wallet instructions.
Method 1 — Direct Bank Card Withdrawal
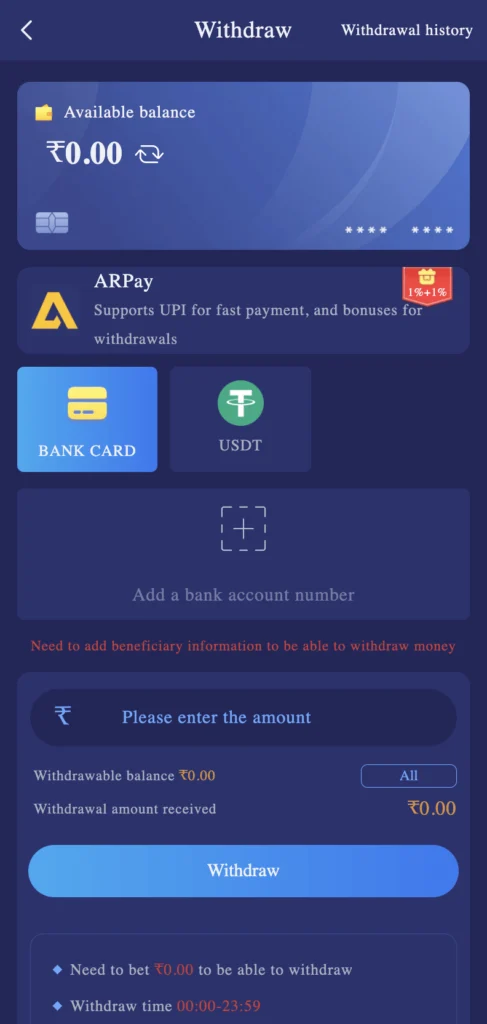
- In Withdraw, choose BANK CARD.
- If first time, tap Add a bank account number and fill: Bank, Full recipient’s name, Account number, Phone, IFSC, then Save.
- Enter the amount and tap Withdraw.
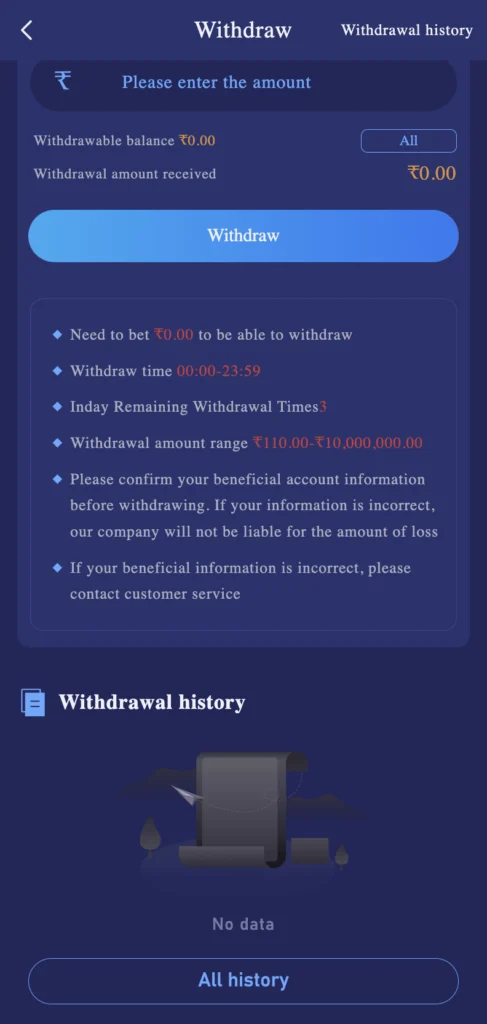
- Check the in-app rules (per screenshot):
- Time window: 00:00–23:59
- Daily attempts: up to 3
- Withdrawal amount range: ₹110.00–₹10,000,000.00
- Confirm your beneficiary details; wrong info may cause loss or delays.
- Track status in Withdrawal history.
Method 2 — USDT (TRC20) Withdrawal
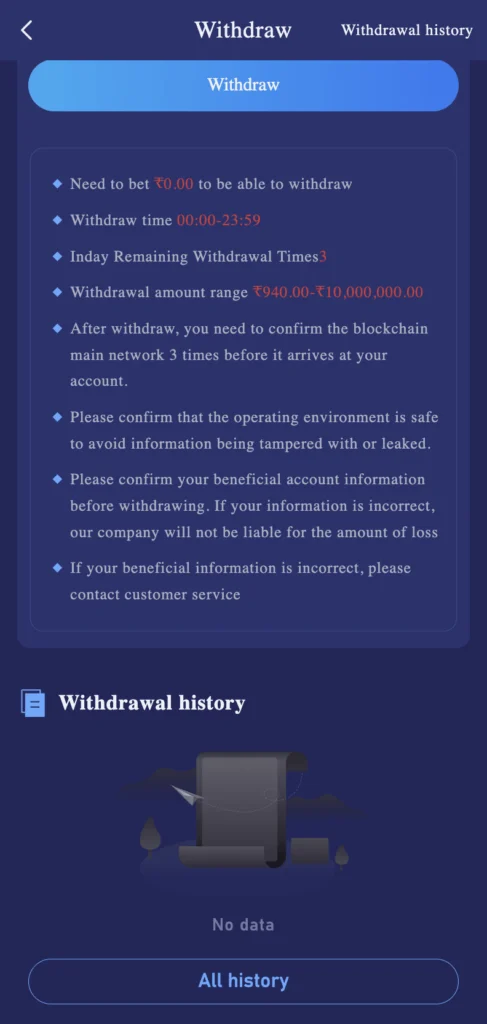
- Choose USDT, then fill in the withdrawal amount (INR and USDT fields as prompted).
- Review on-screen rules (per screenshot):
- Time window: 00:00–23:59
- Daily attempts: up to 3
- Withdrawal amount range: ₹940.00–₹10,000,00.00
- After you submit, the blockchain needs 3 main-net confirmations before funds arrive.
- Keep your environment secure; verify address/network (TRC20).
- Submit. Monitor Withdrawal history for completion.

Method 3 — AR Wallet (Fast payouts via ARPay)
What is AR Wallet (in Tiranga Game)?
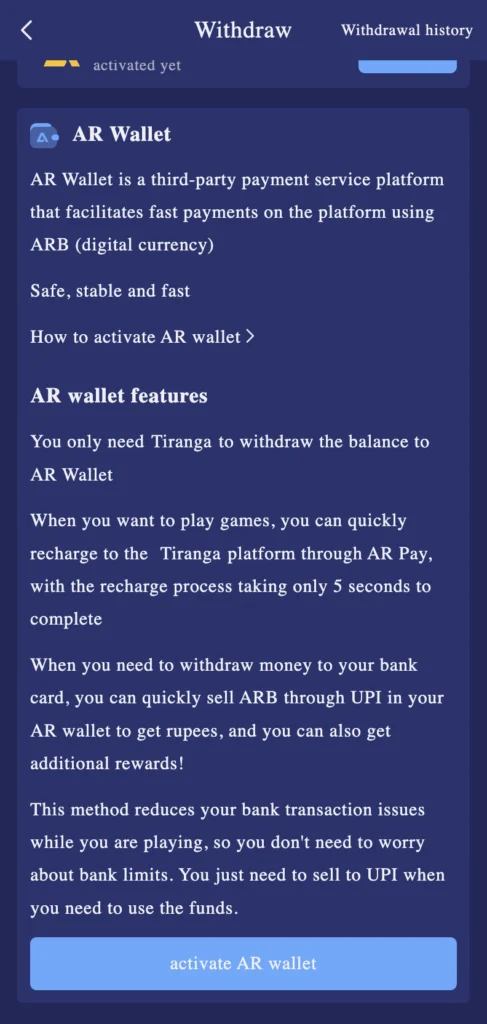
AR Wallet is Tiranga’s third-party payment rail that converts your in-app balance to ARB (digital currency) for quick payouts. It’s designed to be safe, stable, and fast, and often includes bonus promos.
My experience: I opened the Withdraw tab, read the AR Wallet instruction card, tapped Activate, verified my mobile via OTP, set a 4-digit payment PIN, and saw “Activation Successful.” After that, the AR Wallet option appeared for instant withdrawals.
Step 1 — Open Withdraw & read the AR Wallet instructions
- From the bottom bar, tap Account › Withdraw.
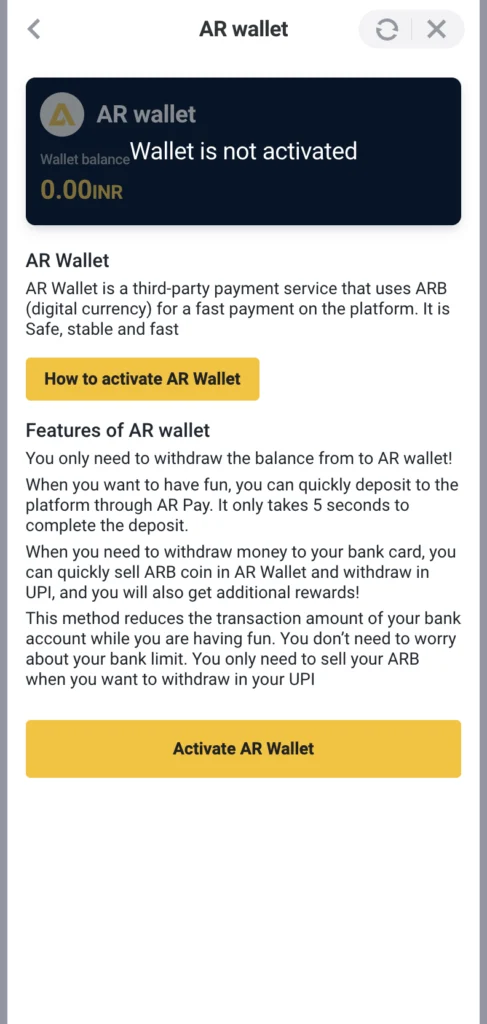
- On the Withdraw screen, locate the AR Wallet section and tap “How to activate AR Wallet ›” to quickly review rules, benefits, and security notes.
Step 2 — Start activation
- In the AR Wallet card, tap Activate.
- You’ll be taken to the activation window that summarizes benefits and the Activate AR Wallet CTA.
Step 3 — Verify your mobile (OTP)
- Enter your mobile number (country code auto-selected).
- Tap Continue to receive an OTP.
- Enter the OTP to verify.
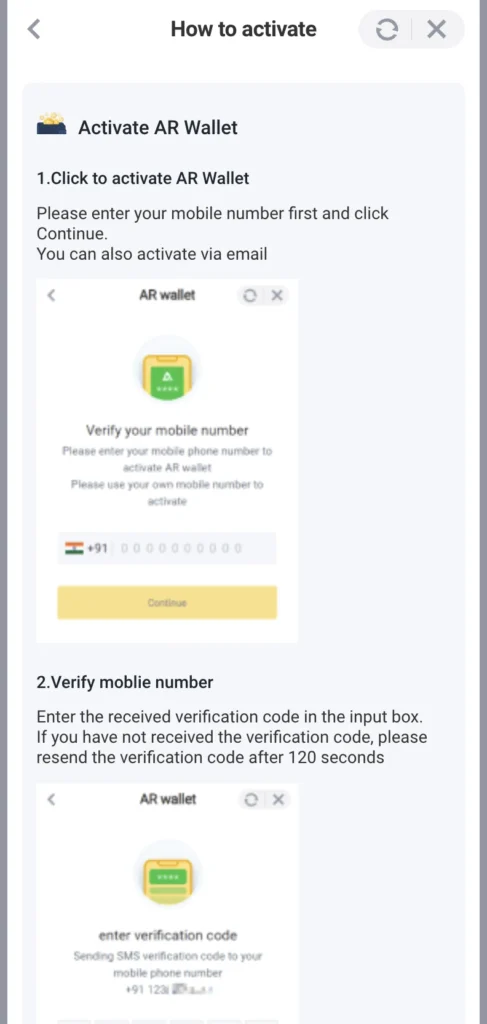
Troubleshoot: If OTP doesn’t arrive, wait 120 seconds and tap Resend. Ensure network/SMS not blocked.
Step 4 — Set your 4-digit payment password
- Create a 4-digit payment password (PIN).
- Add a password hint (recommended).
- Confirm to finish.
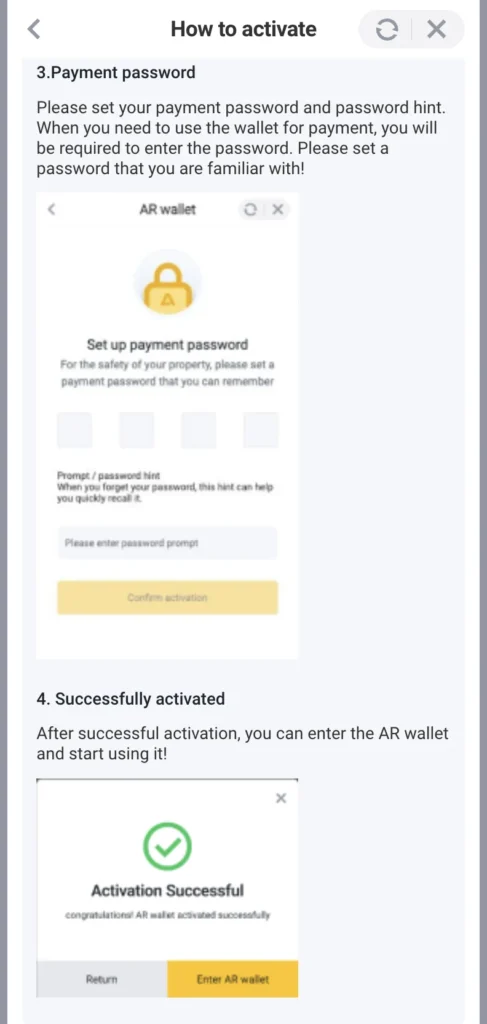
You should now see Activation Successful.
Step 5 — Make a withdrawal to AR Wallet
- Go back to Account › Withdraw.
- Choose AR Wallet as the method.
- Enter the withdraw amount and tap Withdraw.
- Funds move to your AR Wallet. You can later sell ARB via UPI from within AR Wallet to receive INR (often with extra rewards).
Tiranga App Deposit: Fast & Simple Guide
Funding your Tiranga app wallet is quick. Choose UPI × QR, E-Wallet, Paytm QR, or USDT, then enter ₹200–₹50,000, pay the QR/address, and confirm. Our Tiranga Game deposit guide shows screenshots of each step and Deposit history, with fixes for common issues so money reflects fast—reliably every single time.
FAQs – Tiranga withdrawal:
1) tiranga withdrawal time / tiranga withdrawal time today
Withdrawals are available 00:00–23:59 (shown on the Withdraw screen). You also see remaining daily attempts and the eligible amount range before you submit.
2) tiranga withdrawal (how it works)
Open Account → Withdraw and pick a method: Bank Card, USDT, or AR Wallet. Enter the amount, follow the on-screen prompts (bank/UPI details, USDT address, or AR Wallet PIN), then submit.
3) tiranga withdrawal history
Go to Account → Withdraw → Withdrawal history. You’ll find each request with time, method, and status; use the All history button to see the full list.
4) tiranga withdrawal proof
Use a combo of:
- In-app Withdrawal history entry (order number + status)
- Your bank/UPI/USDT transaction receipt or hash
- If you used AR Wallet, the sell/UPI receipt inside AR Wallet
Keep screenshots until funds settle.
5) tiranga withdrawal problem
Common causes: wrong beneficiary details, amount outside allowed range, exceeding daily attempts, or network/UPI delays. Fixes:
- Recheck bank name/IFSC/account (Bank Card) or USDT network/address (USDT)
- Stay within the on-screen min–max range and time window
- Ensure you’ve met any wagering rules shown on the page
- If still stuck, contact in-app Customer Service with your order number and payment receipt.
6) tiranga withdrawal processing / processing problem
“Processing” means Tiranga has your request and it’s moving through verification/payment rails. It can take longer during bank/UPI peak times or blockchain confirmations (USDT). If it stays “Processing” unusually long, raise a ticket with order number + receipt, and avoid resubmitting duplicates.
7) tiranga withdrawal screenshot / photo
Open Withdrawal history, tap the specific order, and take a screenshot that shows order number, method, time, and status. Pair it with your bank/UPI/USDT receipt for complete proof.
